Showing posts with label breakfast. Show all posts

Wednesday, September 18, 2013

Spiced Summer Squash Bread

The end of summer is upon us. Can you feel the crispness in the morning air? See the leaves starting to change colors? Or maybe noticed Starbucks has pumpkin flavored everything again in season? However you notice it, its happening. And fast! For us gardeners, that means it's time to use up summer fruit and vegetables before the frosts start in a few weeks.
A few weeks ago I noticed a plethora of summer squash in the garden, and hopped to it. Realizing I hadn't made any breakfast breads in a spell, I opted to try my hand with a squash bread (which is fairly similar to a zucchini bread). And what an easy recipe! I think the most tedious part is shredding the squash, although if you have a food processor you can save some time here. But all in all this is an easy recipe, and a hit with the taste testers. Happy fall, y'all!

Spiced Summer Squash Bread

  • 1 1/2 cups all-purpose flour
  • 1 tsp baking powder
  • 1 tsp baking soda
  • 1/4 tsp salt
  • 2 tsp cinnamon
  • 2 eggs, room temp. 
  • 3/4 cups sugar
  • 1/2 cup vegetable oil (or replace it with applesauce for a healthier version)
  • 2 tsp vanilla
  • 1 1/2 cups yellow summer squash, shredded
  • Chopped walnuts, for topping (optional)

Preheat the oven to 350 F degrees. Butter and flour a loaf pan.

Combine the flour, baking powder, baking soda, salt, and cinnamon in a bowl and set aside.

In a separate bowl, beat together eggs, sugar, oil, and vanilla. Next gently stir in the yellow squash (watch out, it may splash out of your mixer at this point). Then mix the dry ingredients into the wet ingredients and combine until mixed.

Pour the batter into the prepared cake pan, sprinkle with chopped walnuts, and bake for 45-50 minutes or until a test stick comes out clean. Cool on a wire rack for 15 mins, then carefully remove the loaf from the pan and continue to let cool. Slice and serve!


Sunday, June 9, 2013

Cinnamon Rolls & Bert

If you are in any of my circles, you will likely know who Bert is by now. Just in case, this is Bert. Also goes by Bertie, Meow Meow, and some 7 year old gibberish name I am unable to pronounce. I could go on and on about the various reasons he is awesome, but I will let pictures do most of the talking for me.
His ability to go with the flow is amazing for a 10 week old kitten. Whether it be a pair of rough hands poking and prodding him, the two cattle dogs nosing him around like a soccer ball, or the abyss that is the staircase...he goes with the flow. Mellow fellow. Super chill. We love him. 
The day before we picked up Bert, in celebration of an upcoming feline addition to the household and end of class term for folks, I baked up a batch of cinnamon rolls. Let's just say I have another weakness to add to the nutella list. I can only make these for special occasions and then immediately leave the premises to ensure there are rolls remaining for others to eat. I'm learning that a lady can have many forms of kryptonite in this life
I blame the frosting for my weakness, which is nothing more than buttery goodness drizzled over hot cinnamon buns. As far as cinnamon rolls go, this recipe I found over at Sally's Baking Addiction is super easy. I made my dough and formed the rolls in the pan the night before, then brought the pan back to room temp, letting the rolls rise again, before I attempted any baking. The wee taste testers loved them and I plan to explore some nuttier version in the near future. Now, it's time to do some eating. Happy almost summer! 

Cinnamon Rolls
Borrowed from: Sally's Baking Addiction
Rolls
  • 2 3/4 cup all-purpose flour
  • 3 tbsp granulated sugar
  • 1 tsp salt
  • 1 package Red Star Platinum Yeast (1 packet = 2 1/4 tsp)
  • 1/2 cup water
  • 1/4 cup milk (cow's milk - I used skim)
  • 2 1/2 tsbp unsalted butter
  • 1 large egg
Filling
  • 3 tbsp unsalted butter, softened to room temperature
  • 1 1/2 tbsp ground cinnamon
  • 1/4 cup granulated sugar
Coffee Glaze
  • 1 cup powdered sugar
  • 1 tsp vanilla extract
  • 2 tbsp milk or cream 
Make the dough: Set aside 1/2 cup of flour. In a large bowl, toss the remaining flour, sugar, salt, and yeast together until evenly dispersed. Set aside.

Heat the water, milk, and butter together in the microwave until the butter is melted and the mixture is hot to touch. About 125F-130F degrees. Stir the butter mixture into the flour mixture. Add the egg and only enough of the reserved flour to make a soft dough. I used nearly all of it, but you may not need to. Dough will be ready when it gently pulls away from the side of the bowl and has an elastic consistency.

On a lightly floured surface, knead the dough for about 5-6 minutes. Place in a lightly greased bowl (I used non-stick spray) and let rest for about 10 minutes.

Make the filling: After 10 minutes, roll the dough out in a 14x8 inch rectangle. Spread the softened butter on top. Mix together the cinnamon and sugar and sprinkle it all over the dough. Add more cinnamon/sugar if desired. Roll up the dough tightly. Cut into 11 even pieces and place in a lightly greased 9-inch round pan. I used a pie dish, lightly sprayed with nonstick spray. Loosely cover the rolls with aluminum foil and allow to rise in a warm, draft-free place for 60-90 minutes. Here is what I do: heat the oven to 200F degrees. Turn oven off. Place rolls inside oven and allow to rise.

After the rolls have doubled in size, preheat the oven to 375F. Bake for 25-30 minutes until lightly browned. I covered the rolls with aluminum foil after 15 minutes to avoid heavy browning.

Make the glaze: Right before serving, top your cinnamon rolls with glaze. Mix the powdered sugar and milk or cream together until smooth and drizzle over rolls. To thicken the glaze, add more powdered sugar and then add salt to cut the sweetness, if desired.

Sunday, May 5, 2013

Bake Beignet Bites with Blueberry Dipping Sauce

Oh Saturdays, how I love thee. I could count the ways, but let's be honest - you all get why I love Saturdays. Mellow mornings, sleeping in, happy dog runs, a reason to make stellar breakfasts for the family. We have a theme around here for Saturday mornings; it involves me and some sort of tasty breakfast of the kids' choosing. Previous weekends have led to pancakes, waffles with homemade whipped cream, crepes, sourdough french toast. This week's breakfast project: baked beignet bites.
My first introduction to beignets started in New Orleans, as it should. Sitting at Cafe du Monde across from Jackson Square, people watching while I managed to cover myself in powdered sugar goodness and eat delicious deep fried pillows of dough. So good!
With someone in the family having to monitor his cholesterol these days, I opted to skip the deep frying portion of the traditional recipe and go with baking the beignets instead. Yes, I know it isn't the traditional method of making these and therefore maybe not as good. I will be the first to admit that. However, they still turned out to be very yummy and a favorite of the household. The blueberry dipping sauce was a late addition and well worth it (lots of room to make any sort of fruit flavored dipping sauce). So until I make my way back to NOLA, these little babies will be keeping me company and covered in powdered sugar. Enjoy!

Baked Beignet Bites with Blueberry Dipping Sauce
Borrowed from: Pick Fresh Foods
  • 1 (1/4-ounce) envelope active dry yeast
  • 3 tablespoons warm water (100° to 110°)
  • 3/4 cup milk
  • 1/4 cup sugar
  • 1/4 cup unsalted butter, softened
  • 1 teaspoon salt
  • 1 large egg, lightly beaten
  • 3 cups all-purpose flour
  • Powdered sugar
In a large bowl combine yeast and 3 tablespoons warm water; let mixture stand 5 minutes.

Heat milk in a small saucepan over medium heat (do not boil). Once small bubbles begin to form on sides of pan, stir in sugar, butter, and salt. Stir until butter is melted. Remove from heat and cool.

To yeast add milk, egg and 2 cups of flour. Stir with wooden spoon. Dough will be very sticky. Gradually stir in enough remaining flour to form a soft dough.

Turn dough out onto a floured surface; knead 8 to 10 minutes or until dough is smooth.

Place in a greased bowl, turning to dough to coat. Cover and let rise in a warm place 1 hour or until doubled in size. 

Punch dough down and turn it out onto a floured surface. Roll dough into a large rectangle about 1/4 in thickness; cut strips to form 2-inch squares. Place on a floured surface; cover and let rise in a warm place, free from drafts, 30 minutes or until doubled in size.

Preheat oven to 400 F. Coat baking tray with cooking spray. Place dough 2 inches apart on to tray. Bake 7-10 minutes. Sprinkle with powdered sugar while still warm.

Blueberry Dipping Sauce
  • 1/2 cup Fresh Blueberries
  • 3-4 tbsp Blueberry Preserves/Jam
  • 1/4 cup White Sugar
  • 1-2 tbsp Cornstarch 
  • 2 tbsp Lemon Juice
In a saucepan, mix together all of the ingredients. Bring to a very gentle bubbly boil then reduce heat to a simmer and leave on the stove for 10-15 minutes or until the sauce begins to thicken. Add more sugar and/or lemon juice to meet personal taste preferences. Remove from the stove and let cool before serving.

Sunday, April 7, 2013

Homemade Granola Bars

This week I rediscovered my baking roots, so to speak. After a period of time without a well-functioning oven, I finally have one that works the way it should. Yippee! Needless to say I have been baking and cooking up a storm lately: strawberry dream cake, uber dark chocolate muffins, baked tofu, and a personal fav, homemade granola bars. Yes, I channeled my inner hippie, donned some birkenstocks and socks (just kidding), and made granola.
I actually ended up making two separate batches of granola bars this week, one with nuts and one without. Being a fan of nuts, I would recommend adding them to any homemade bars however going the rice crispies route also works for those out there who have nut allergies. For me, it is really a matter of what I have in the cupboards so I don't have to face the monstrosity of the supermarket again (torture, I swear).
One of the things I am still figuring out is how to keep these bars firm and not have them end up chewy (although some folks love chewy granola bars). Leaving them in the fridge until ready to eat is one way, however it doesn't make it easy for taking these along on a hike. As much as I am not a fan of corn syrup, that may be the way I go next time around.
Both times the bars were well received, much more so with the nut bars. They are great with all sorts of seeds, nuts, dried fruits, chocolate chips, etc. Go wild, let your inner hippie shine a bit, and surprise your pals and kids with the goodness (and ease) of homemade granola. Save the end bits and serve as a yogurt parfait. Enjoy!

Homemade Granola Bars
Adapted from: Inspired Taste

  • 2 1/2 cups old fashioned rolled oats
  • 1/2 cup whole walnuts, coarsely chopped
  • 1/3 cup honey
  • 1/4 cup unsalted butter, cut into pieces
  • 1/4 cup packed light brown sugar
  • 1/2 teaspoon vanilla extract
  • 1/4 teaspoon kosher salt
  • 1/2 cup dried apricots, coarsely chopped
  • 1/4 cup raisins 
  • 1/2 tsp cinnamon 
  • 1/4 cup plus 2 tablespoons white chocolate chips


Preheat oven to 350 F. Line bottom and sides of a 8-inch or 9-inch square pan with aluminum foil.

Add oats and walnuts to a small baking sheet then bake 5 minutes, stir and bake another 3 to 5 minutes until lightly toasted. Transfer to a large bowl.

Combine butter, honey, brown sugar and the salt in a small saucepan over medium heat. Cook, stirring occasionally until butter melts and the sugar completely dissolves.


Pour butter mixture in to bowl with toasted oats and walnuts. Mix well. Let cool about 5 minutes then add apricots, raisins, cinnamon, and and 1/4 cup of the white chocolate chips. Stir to combine.

Transfer oat mixture to lined pan then use a rubber spatula to firmly press the mixture into the pan. (Press hard here, this way the bars will stay together once cooled and cut).

Scatter remaining 2 tablespoons of white chocolate chips over pressed granola mixture then use a rubber spatula to gently press them into the top. Cover then refrigerate at least 2 hours.

Remove block of granola mixture from pan then peel away aluminum foil. Cut into 12 bars.


Monday, December 3, 2012

Easy Buttermilk Biscuits

Let me let you all in on a little secret - baking isn't hard. Truly. Baking is half science (this + this + this = that) and half art form (creativity and letting your baking flare shine). I usually instruct my first time bakers to stay in the shallow end of the pool and try something simple for their first go-round. For instance, biscuits! Anyone who claims that biscuit making is a hard thing is crazy, or lazy, or both. Making biscuits is easier than making chocolate chip cookies!
Besides the ease factor, buttermilk biscuits are a wonderful accompaniment to nearly any meal. They make great leftovers and last for days in an airtight container. And they are fabulous for making little breakfast sammies (cheese, fried egg, bacon...goodness happening there). I encourage any of you who may have been following my blog yet apprehensive about jumping into the baking world to give their first shot at baking a go with this recipe. I promise you won't regret it!

Easy Buttermilk Biscuits 
Adapted from: Kid Cultivation 

  • 2 cups flour
  • 4 tsp. baking powder
  • 1/4 tsp. baking soda
  • 3/4 tsp. salt
  • 4 tbsp. cold butter
  • 1 cup buttermilk, chilled

Preheat oven to 450 degrees

Combine flour, baking powder, baking soda, and salt in a large bowl. Cut in the butter using a pastry cutter or two forks until the dough resembles course crumbs. Sometimes using your hands works best. Make a well in the center, pour in the chilled buttermilk. Mix only until the dough comes together. No more than absolutely necessary.

Turn the dough out onto a floured surface. Knead 5-6 times and press to a 1-inch thickness all around. Cut out biscuits with a 2-inch round cutter or use the rim of a glass near the size of the biscuits you want. Place biscuits on a baking sheet so their edges just touch. Reform dough and repeat.

Bake until fluffy and light golden brown, about 15-20 minutes. Watch the bottoms to make sure they don't brown up too fast. Serve warm with more butter, jam, or garlic chive butter. 

Variations on this receipt can include adding your favorite herb or spice to the dough, flavored sea salts, or even adding garlic and cheese to the recipe. 

Tuesday, October 23, 2012

Pumpkin Cream Cheese Muffins

It's my birthday! Squeeeeee! And to celebrate, I bring you Pumpkin Cream Cheese Muffins for your daily pleasure. Finger-licking goodness right here.
Continuing on with my pumpkin recipe craze, I recently made these when I discovered I needed to use up both some pumpkin puree and cream cheese about to expire in the fridge (I am a very opportune baker, you know).
After researching high and low, I decided to base my recipe off of one featured on Naturally Ella. The receipt itself had a complete overhaul, adding extra spices, changing how the wet and dry ingredients are combined, and of course adding extra love. These muffins are great for breakfast or as a mid-day treat. If you happen to be carving a pumpkin, save any of the fleshy meat from inside and make a batch of Pumpkin Cream Cheese Muffins!
And to leave you all with a bit of glee, here are a few fun shots from last year's epic bday celebrations - 2011 Awkward Prom. Prost! Genatzt! Cheers!

Pumpkin Cream Cheese Muffins
Adapted from: Naturally Ella 

  • 1 1/2 cup unbleached all purpose flour
  • 1/2 tsp each: cinnamon and nutmeg
  • 1/4 tsp each: ginger and pumpkin pie spice
  • 1/8 tsp allspice 
  • 1/2 tsp salt
  • 1/2 tsp baking soda
  • 1/2 cup butter
  • 1/3 cup brown sugar 
  • 1/3 cup white sugar
  • 2 eggs, room temperature 
  • 1 can pumpkin puree

Filling:
  • 4 ounces whipped cream cheese
  • 1/4 cup white sugar
  • 1 tablespoon milk
  • 1 tsp vanilla extract 
  • Topping:
  • 2 tbsp sugar
  • tbsp cinnamon

Preheat oven to 350 F. Line a muffin tin with paper liners or grease. 

In a small bowl, whip together filling ingredients and set aside.

In a large bowl, combine dry ingredients for the main part of the muffin and stir to combine (flour, spices, salt, baking soda). 


In a separate bowl in your mixer, beat the butter for 1 minute. Next add both sugars and continue to combine. Follow by adding the eggs one at a time and finish with adding the pumpkin puree. Gently stir the dry ingredients into the wet ingredients, being careful not to over mix (a few lumps are still okay.) Fill each muffin tin half full with the batter. Then spoon a teaspoon to tablespoon of the cream cheese mixture on top, and finally finish with the remaining batter (if you don’t cover all the cream cheese, don't worry, it makes the muffins look more marbleized). Sprinkle with cinnamon and sugar.

Bake for 20-25 minutes or until the muffins springs back when you press lightly. I also rotate halfway through so that the muffins bake evenly. Let cool for a few minutes in the pan, then transfer to a wire rack and finish cooling. Make sure to store in an airtight container, preferably in the fridge if not eaten immediately due to the dairy in these babies. 

Friday, September 28, 2012

Sage, Apple, Cheese Scones for Fall

Fall is upon us! Tomorrow night brings the harvest moon (one of the brightest moons of the year, once important to farmers). And just around the corner is my favorite holiday, Halloween. `Tis the season of corn mazes, haunted houses, and pumpkin flavored everything. Just thinking about autumn gets me all smiley. 
One of the things I adore most about fall are the colors. Playing around with a few new lenses, I have every excuse to be outside enjoying the last of the near-summer weather. Of course one of my trusted four-legged sidekicks makes for great photo material. Such a good boy, all he wants is for me to throw the ball (forever). 
However, he does not get kudos for substituting our hard-shelled buddy here for his ball. A story I shall return to another day. Poor guy, I call him Walter. This is about the 8th time we have had to rescue him from the jaws of death (i.e. Clover the wonder dog). I now have a turtle play pen area I keep sectioned off for when Walter here needs a few minutes to regain his composure in between Clover carrying him around in his mouth. 
Another thing I love about fall is the reminder to use up everything in the garden before frost season sets in. We planted a small pineapple sage bush in our front area (turtle play pen) and it has become a beast of a plant. Needing an excuse to trim it back, I ran across this recipe for scones using sage. Perfect!
In addition to replacing half of the sage with pineapple sage, I used a large gala apple as my apple of choice and had left over shredded cheese blends in the fridge which I opted to use in place of dicing up a block of cheddar. The result yielded a moist scone (perfect for reheating) with a subtle flavor. Next time I think I might opt for the original sage instead or possibly add some honey to the top if I keep the pineapple sage. Mmm, more scones. Enjoy!

Sage, Apple, Cheese Scones
Adapted from: Sage, Apple, & Cheddar Scones
  • 4 cups flour
  • 4 teaspoons baking powder
  • 3/4 teaspoon salt
  • 2 teaspoons sugar
  • 1 cup very cold butter cut into small pieces
  • 2 large eggs
  • ¼ cup plus 2 tablespoons heavy cream
  • 2 apples, finely diced
  • 3 teaspoons finely minced sage (half pineapple sage if possible)
  • ½ cup diced or shredded cheese (I used an Italian/Mexican blend)
Preheat the oven to 375˚. 

In the bowl of a food processor, combine the flour, baking powder, sugar and salt. Pulse to mix. Add the cold butter to the flour mixture and pulse until mixture resembles a coarse meal. Transfer mixture to a bowl and stir in the apples, cheddar and sage. Place in freezer for 5-10 minutes.
In a small bowl combine the eggs and ¼ cup of the heavy cream. Whisk well to combine.
Add eggs and cream to the flour mixture and stir until dough just comes together. Add additional tablespoons of heavy cream if necessary.
Turn out the dough on a lightly floured surface. For mini scones divide the dough into four equal portions. Form each portion into a rough circle 5-6 inches across. Cut each circle into 6-8 wedges. For large scones form two 8-10 inch circles, then cut into wedges.
Place wedges on a parchment lined baking sheet and bake for 20-25 minutes or until lightly browned.


Thursday, September 15, 2011

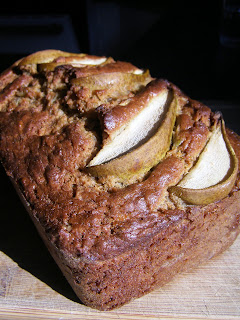
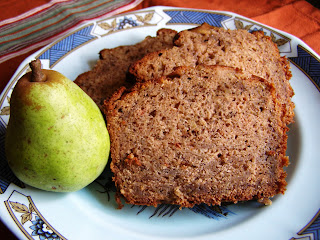
Spiced Pear Banana Bread


Last weekend I escaped. No, not from jail. From the monotony of my daily life. And headed for the coast.


Ah yes, the Oregon coast. How I adore thee!


Windy beaches free of crowds, an amazing local aquarium, local breweries - what's not to like?


Of course I had to bring some baked goods for the road. The pear tree out back finally got the message this year and has been producing like crazy! Even after gifting away 10 lbs. of pears, I still found myself with an abundance to use up and fast. So as a treat to myself, I brought along a freshly baked loaf of Spiced Pear Banana Bread.


Try not to drool on the keyboard, which you would be doing if computers had the ability to release scents (omg, did this recipe smell great during the baking process).


Using the pears from the yard, the eggs from our feathered ladies, and a few bananas I had stowed away in the freezer, this was a fairly easy recipe. I adapted it from Banana Bread Recipes, using shredded pears in place of mashed ones and adding almond extract (my secret weapon).


It did brown a bit around the edges, but made for some amazing flavor. This recipe is definitely a keeper! Enjoy!

Spiced Pear Banana Bread
Adapted from: Banana Bread Recipes

  • 2 cups flour
  • 1 tsp baking soda
  • 1 tsp cinnamon
  • 1/2 tsp ginger
  • 1/4 tsp nutmeg
  • 2 mashed bananas
  • 2 cups shredded pears
  • 1/2 cup white sugar
  • 1/2 cup brown sugar
  • 1/2 cup butter, room temperature 
  • 1/4 cup non-fat vanilla yogurt
  • 2 eggs
  • 1 tsp vanilla extract 
  • 1/2 tsp almond extract 


Preheat the oven to 350F. Grease a loaf pan and coat with flour to prevent sticking.
In a medium mixing bowl, mix together the flour, baking soda, cinnamon, ginger and nutmeg.
In another mixing bowl, cream together the white sugar, brown sugar and butter. Scrape down the sides of the bowl and make sure everything is well incorporated. 
Mash the bananas in another bowl. Shred the pears into another small bowl. 
Stir the banana into the sugar and butter mixture. Then add in the eggs, vanilla and almond extracts, stirring well. Next stir in the yogurt, again mixing well. And finally add the shredded pears. 
Slowly pour the wet mixture into the dry mixture, stirring constantly. Mix really throughly until everything is perfectly blended together.
Spoon the mixture into your prepared loaf pan. You can place a few slices of pear on top and sprinkle with a little brown sugar for decoration if you desire.
Place the loaf pan in the center of preheated oven and bake on 350F for 1 hour to an 1 hour 20 mins. Cooking times may vary, so check if the bread is done by inserting a toothpick or knife into the middle of the loaf. As soon as that toothpick comes out clean, take the loaf out! You don't want to overcook it.  
Allow the banana bread to cool in the loaf pan for about 10-20 minutes. The cooling is important because the loaf will solidify fully as it cools. Then remove it from the pan and let stand for another 20 minutes or so until it has cooled. Slice and enjoy! 


Wednesday, June 22, 2011

Bananas Foster Bread


Why yes, this bread is just as delicious as it looks! My new fad - add yummy (alcoholic) flavors to breakfast breads. Someone had already thought of this one, over at Sweetpea's Kitchen, however I still had to try my own take on it.


This is yet another example of why I MUST distribute my baked goods immediately or else I run the risk of being the human vacuum cleaner of food. I think I literally ate half a loaf of one of these bad boys. And it was worth every bite!


I didn't change much with the receipt other than to double it and modify a few ingredient amounts; it honestly didn't need it. And with the leftover rum, I am jumping into a few cupcake ideas which I plan to share with you lovely folk soon. Enjoy! And happy summer!!

Bananas Foster Bread
Adapted from: Sweetpea's Kitchen 

  1. 2 1/2 cups mashed ripe banana
  2. 2 cup packed brown sugar, divided
  3. 12 tablespoons butter (3/4 cup), melted and divided
  4. 1/2 cup dark rum, divided
  5. 2/3 cup plain fat-free yogurt
  6. 4 large eggs
  7. 1/2 teaspoon vanilla 
  8. 3 cups all-purpose flour
  9. 1/2 cup ground flaxseed
  10. 1 1/2 teaspoons baking soda
  11. 1 teaspoon salt
  12. 1 teaspoon ground cinnamon
  13. 1/4 teaspoon ground allspice
  14. 2/3 cup powdered sugar

Preheat the oven to 350 degrees F. Grease bottom and sides of two 9 x 5-inch loaf pan; dust with flour, tapping out excess.

In a nonstick skillet over medium heat, combine banana, 1 cup brown sugar, 10 tablespoons butter, and 6 tablespoons rum. Cook over medium heat until mixture begins to bubble. Remove from heat; cool. Place banana mixture in stand mixer fitted with the paddle attachment. Add yogurt, remaining 1 cup brown sugar, and eggs. Beat at medium speed until combined.

In a medium bowl, combine flour, flaxseed, baking soda, salt, cinnamon and allspice. With the mixer on low, add flour mixture to banana mixture and beat just until blended. Pour batter into the prepared pans. Bake at 350° for 1 hour or until a toothpick inserted in center comes out clean. Remove from oven; cool 10 minutes in pan on a wire rack. Remove bread from pans; place on wire rack.

While the bread is cooling, make the glaze by combining remaining 2 tablespoons melted butter, remaining 2 tablespoons rum, and powdered sugar; stir until well blended. Drizzle over the warm bread. Try not to eat it all at once! 

Sunday, May 8, 2011

Happy Mother's Day & Lavender Coffee Cake


What would the world do without mothers? It would be a compassionless place, that's for sure.


Mothers bring life into the world, spreading warmth, reassurance, and laughter wherever they go (in most cases). With just the right combo of gentle nudging and tough love, mothers prompt most of us to be better people. I, for one, am very grateful for mine.


In an ode to my mother who happens to be farther away from me than my baked goods can usually safely travel, I made a Lavender Coffee Cake for those folks in my daily life. Discovered and shelved away quite some time ago, this recipe is an oldie but goodie. I opted for the classic bundt cake style, and have had nothing but raving reviews about it.


Exploring this cake in a cupcake format may be in my future. I can't even begin to describe the rich scents coming from the oven while I was baking it. The changes I made in the adaptation were slight: using more dried lavender buds, adding almond extract, and going with non-fat yogurt for the milk base. While I can't even imagine this cake sticking around longer than a few days, I did notice that the first three were the most flavorful. Enjoy!

Lavender Coffee Cake 
Adapted From: Joys of Lavender

Topping
  • 1 cup chopped walnuts
  • 1/2 cup brown sugar
  • 3 tsp. cinnamon
Batter
  • 3 cups all-purpose flour
  • 1 tsp. baking soda
  • 1 tbs. baking powder
  • 1 tsp. salt
Other Ingredients 
  • 3/4 cups butter, softened
  • 1 cup sugar
  • 3 tsp. dried lavender buds (pulse this in blender with 1/2 cup of above sugar)
  • 1/2 cup of brown sugar
  • 3 eggs
  • 1 and 1/2 cups of non-fat yogurt
  • 2 tsp. vanilla extract
  • 1/2 tsp almond extract 

Preheat oven to 350 degrees F. Grease the pan size(s) of your choice. If you have extra lavender buds, sprinkle a few on the bottom of the bundt pan to decorate the top of the cake once baked.

Mix together the topping ingredients and set aside.

Next, mix together the batter ingredients and set aside.

Cream the butter. Then add the sugars and then the eggs one at a time. Beat until light and fluffy. Blend in the yogurt and dry ingredients, alternating between the 2. Add the vanilla and almond extracts.

Put half of the batter into your pan. top with 1/2 of the topping. Swirl it in gently with a fork so it is just lightly blended. Repeat with the remainder of the batter and topping.

I used a bundt pan, which required about 45 minutes. The original recipe calls for the following cooking times:
  • One 10-inch tube pan or Bundt pan 50 to 60 minutes.
  • One 9-inch springform pan for 60 to 70 minutes.
  • Two 4 1/2 x 8 1/2 inch loaf pans for 40 to 50 minutes.
  • Two 8-inch round or square cake pans for 30 to 35 minutes.

Bake until done. The top will spring back when pressed gently in middle or use toothpick or knife in center of cake, If it comes out clean, remove from heat and cool for 10 minuets before you remove it from your pan.

Monday, April 25, 2011

Banana Blackberry Lemon Muffins


A few weeks ago I had a request for more breakfast muffins as a parting gift for a friend's office, this time without any peanuts or strawberries. After doing some hunting, I came across an old Banana Blueberry Lemon Muffin recipe from Dragon's Kitchen. With some finessing and modifications, I created my own version of Banana Blackberry Lemon Muffins and damn if they aren't delicious!


Light, fairly low fat, and healthy. Next time around - no muffin liners. They had the nasty habit of sticking to the liners, which made for a messy eating experience. And they definitely tasted better the next day. Enjoy!

Banana Blackberry Lemon Muffins 
Adapted From: Dragon's Kitchen
  • 1 1/4 cup white flour
  • 1 cup whole wheat flour 
  • 2 teaspoons baking powder
  • 1/2 teaspoon salt
  • 1/2 teaspoon ground cinnamon
  • 2 large ripe bananas, mashed
  • 2 eggs
  • 2/3 cup brown sugar, firmly packed
  • 1/2 cup applesauce
  • 1 tablespoon vanilla extract
  • 1/2 teaspoon almond extract 
  • 1 tablespoon lemon juice
  • 1 cup blackberries, frozen or fresh
  • 2 tablespoons grated lemon rind
  • 3 tablespoons sugar
Preheat oven to 375 F. Lightly grease muffin tin and add liners if desired.

Combine flour, baking powder, salt, cinnamon and 1 tablespoon of the lemon rind.

Beat together bananas, eggs, brown sugar, applesauce, lemon juice, almond extract and vanilla extract until blended.

Stir in dry ingredients until blended. Stir in blackberries just until combined. Spoon into prepared muffin cups, dividing batter equally.

For the topping, combine sugar and remaining lemon rind in small dish. Sprinkle evenly over the muffins.

Bake for 25 minutes or until a toothpick comes out clean. Makes about 16 regular muffins.

Sunday, April 17, 2011

Sweet Potato Banana Muffins


Muffins are one of my go-to comfort foods. Savory or sweet, they serve up a delicious plate of flavors and reassurance that life is good. Hence why my recipe collection includes quite a few muffin recipes.


Honestly I have no idea how I stumbled across this recipe, but these Sweet Potato Banana Muffins proved both delightful and reasonably healthy.


I made quite a few changes to the recipe in my adaptation. Major ones include using white and brown sugars while using less overall, adding allspice and nutmeg, swapping oil for applesauce, and of course adding bananas. Other additions could include chocolate chips (yum), walnuts, yogurt, cranberries, oats, and just about anything else you can think of. PS - your kitchen will smell AMAZING while these babies are in the oven. Enjoy!

Sweet Potato Banana Muffins
Adapted From: This Chick Cooks
  • 1 1/2 cups all-purpose flour
  • 1/2 cup whole wheat flour
  • 3/4 cup white sugar
  • 1/2 cup brown sugar 
  • 2 tsp cinnamon
  • 1/4 tsp nutmeg
  • 1/4 tsp allspice
  • 2 tsp baking powder
  • 1/2 tsp baking soda 
  • pinch of salt 
  • 1 tsp vanilla extract 
  • 2 eggs, at room temperature, lightly beaten 
  • 1 cup cold mashed sweet potatoes, plain
  • 1/2 cup mashed ripe banana
  • 1/4 cup applesauce
  • 1 cup rice or almond milk 
  • chopped walnuts for topping

Preheat oven to 375 F. Line the muffin pan with liners or grease.

In a bowl, mix together dry ingredients, including the flours, baking soda, baking powder, spices, and salt.

In an electric mixer, combine sugar, applesauce, eggs, and milk together. Next, mix in the vanilla. Follow with the mashed bananas and sweet potatoes.

Slowly add dry ingredients to wet ingredients, until just barely mixed. Finish mixing by hand, folding gently together until incorporated. Fill muffin cups 2/3 full and sprinkle walnuts over the top. Bake for 12-18 minutes, depending up mini or regular muffin size. Cool on a rack on the counter. Store in an airtight container for up to 5 days.

Sunday, January 30, 2011

Coconut Muffins


Another breakfast muffin, another tool for bribery. Can't blame a girl for using her talents, right?


After the layered coconut cake from a few weeks ago, I had extra shredded coconut leftover and needed to get some baking therapy action going. Hence my newest breakfast nosh was born - Coconut Muffins.


The recipe is similar to an old one from Mr. Breakfast.com, however I did some modifying (can't help myself). I reduced the baking powder, added some baking soda, swapped the oil for applesauce, used coconut milk in place of regular milk, added vanilla and coconut extracts, and some sugar. Wow, I guess I did change a lot of the original recipe. They ended up great! Not too sweet, very tasty, exactly what you want in a breakfast muffin. Enjoy!

Coconut Muffins
Adapted from: Mr Breakfast.com
  • 1 cup shredded coconut (sweetened is preferred)
  • 2 cups flour
  • 1 tsp baking powder
  • 1/2 tsp baking soda 
  • 1/4 cup brown sugar
  • 1/8 cup white sugar
  • 1/2 tsp salt
  • 1 egg
  • 1 cup lite coconut milk
  • 1 tsp vanilla extract
  • 1 tsp coconut extract
  • 1/3 cup applesauce  
In a medium bowl, sift together dry ingredients except coconut (flour, baking powder, baking soda, sugar, and salt). Set aside.

In a small bowl, combine together egg, milk and applesauce. Add vanilla and coconut extracts and mix. Then add egg mixture at once to dry ingredients.

Stirring mixture only until the dry ingredients are moistened; add shredded coconut. The batter will be lumpy.

Spoon into lightly greased mini muffin tin, filling each cup half to two-thirds full. Bake in a 350 degree oven for 11-13 minutes, or until golden brown. If using regular or jumbo size muffin tins, bake for a few minutes longer.